如何把 Shopify 商品同步到 Rivet(庫存與加購)
從 Shopify 把實時商品庫、庫存和變體 ID 拉進 Rivet Chat。設置自動同步,讓數據始終最新。
For Shopify stores, the most reliable way to load products into Rivet is Sync products from Shopify in the Rivet Chat app. That path reads live Admin data (images, prices, variants, inventory, and variant IDs for Add to cart).
Uploading a Shopify Products → Export CSV is fine for titles and prices, but standard Admin CSVs usually do not include inventory quantity or Variant IDs — stock may show as 0 and Add to cart may be incomplete.
Recommended: Sync from the Shopify app
- Open Shopify Admin → Apps → Rivet Chat → Setup.
- Find the section Sync products for chat cards.
- Click Sync products from Shopify.
- Wait for a success message such as Synced N products (catalog total N).
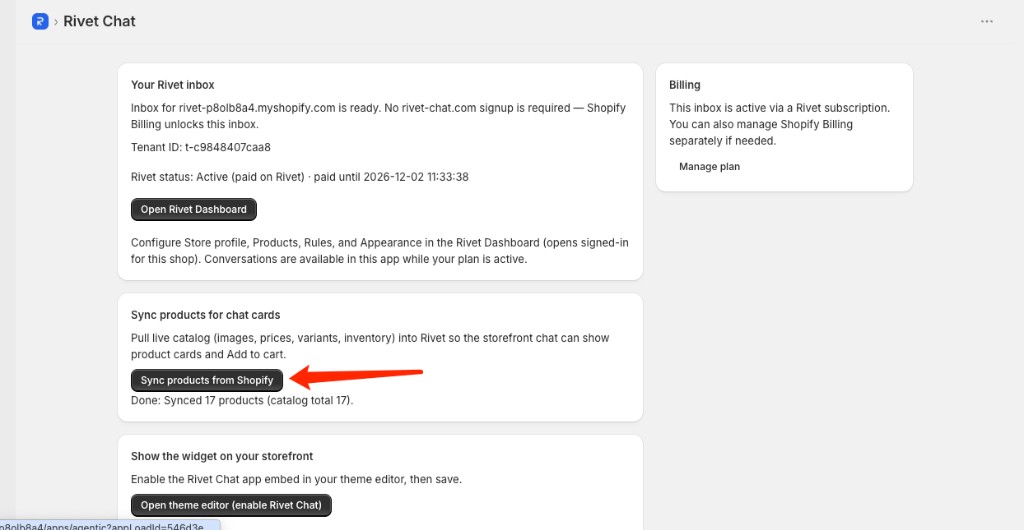
After sync, open Rivet Dashboard → Products and confirm names, prices, and stock look right. Then test the storefront chat with questions like “What products do you have?” or “Is [product] in stock?”
What Sync pulls
- Product title, type/category, description, images
- Price and variants (for chat cards and Add to cart)
- Inventory from Shopify (`totalInventory` / `availableForSale`)
Re-run Sync whenever you change catalog or stock in Shopify so Rivet stays current.
Optional: CSV / Excel upload
Use Dashboard → Products upload when you are not on Shopify, or you only need a simple sheet.
### Shopify Admin CSV
- Source: Shopify Admin → Products → Export
- Rows with the same Handle merge into one product (variants become specs)
- Only Published=TRUE products are imported; draft, archived, and unpublished are skipped
- Product URL becomes your Store profile website + `/products/{handle}` — set Website URL in Store profile first
- No inventory qty / Variant ID in most Admin exports — prefer App Sync for stock and ATC
### Simple CSV / Excel
First row must be headers.
Required: name, category, price
Optional: specs, description, product_url, image_url, stock, warehouse